Let's Learn How to Make Blackout Curtains


The importance of blackout curtains
These bad boys are more than just bits of fabric hanging from your windows; they're game-changers when it comes to improving the quality of your sleep and your overall comfort.
The importance of blackout curtains can't be overstated. They're your secret weapon against unwanted light, be it from the blazing sun during those precious weekend lie-ins or the glaring streetlights that turn your bedroom into a nocturnal wonderland.
Plus, they're your privacy partners, shielding you from prying eyes.
But wait, there's more! Blackout curtains also help regulate room temperature, keeping you cosy in the winter and cool in the summer.
So, whether you're looking to sleep like a champ, binge-watch your favourite shows without the glare, or just spruce up your living space, blackout curtains are about to become your new best friend in the world of home decor.
Gather materials
So, you've decided to dive into the world of DIY blackout curtains – fantastic choice!
The first step on this creative journey is gathering all the materials you'll need. You're going to want to get your hands on some quality blackout fabric, the real star of the show here, as well as blackout lining fabric to give it that light-blocking superpower. You'll also need sturdy grosgrain ribbon, trusty thread that matches your fabric, and of course, a reliable sewing machine. Don't forget the basics like a sharp pair of scissors for cutting your fabric and ribbon, and some pins to keep things in place as you work your magic.
Now that you've got your checklist, let's move on to the exciting part – where to find all these goodies!
This is an easy part – most of them are readily available at your local fabric store or craft shop. Swing by and browse their selection of blackout fabric and lining – they usually offer a variety of colours and patterns to suit your style. Grosgrain ribbon, thread, and sewing machine accessories are also typically on the shelves. If you prefer the convenience of online shopping, websites like Amazon, Fabric.com, and Etsy offer a wide range of options, and you can read reviews from fellow DIY enthusiasts to help you make the best choices.
Measuring and cutting
Grab yourself a trusty measuring tape, or a good ol' tape measure, whichever you prefer. First things first, if you've got existing curtains hanging, consider whether you want your new blackout curtain to cover the same space or maybe go a bit wider for that extra coverage.
Measure the width of your window from edge to edge, and jot it down.
Now, for the length, decide if you want your curtain to just reach the window sill, go all the way to the floor, or somewhere in between – it's your call. Measure from the curtain rod or where you plan to hang it down to your desired length.
Don't forget to do this for each window you're outfitting with your blackout magic. With those measurements in hand, you'll know exactly how much fabric you'll need to work your DIY wonders.
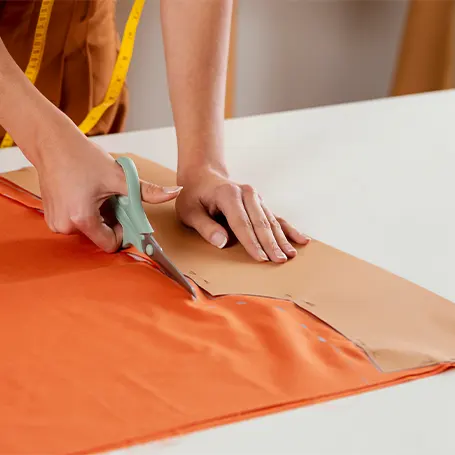
When you've got your window measurements, it's time to cut that blackout fabric to the perfect size.
Lay out your fabric on a clean, flat surface, and remember that old carpenter's saying: “Measure twice, cut once.” Double-check your measurements to make sure you're spot on. Once you're sure, mark the width and length using a fabric pen or chalk – this will serve as your cutting guide. Grab those scissors, take a deep breath, and make those cuts nice and straight.
Chose a sewing method
The Sewing Method:
If you're a sewing whiz or just up for the challenge, the sewing method is a great way to create blackout curtains that are both functional and stylish.
Start by hemming the top and bottom edges of your curtain fabric. For the top hem, fold the fabric over about 2 inches and iron it flat for a clean look. Sew a straight stitch along the folded edge to secure it. Repeat the process for the bottom hem. Now, it's time to turn your curtain panels into blackout wonders. Cut your blackout lining to match the size of your curtain fabric and pin it in place with the fabric's right sides facing each other. Sew a straight line along the side edges, leaving the top and bottom open. Once you're done, flip your curtain right side out, and you've got yourself some DIY blackout curtains that are both functional and stylish.
The No-Sew Method:
Not a fan of sewing? No problem! The no-sew blackout curtains method is here to save the day.
Grab some hemming tape, also known as iron-on tape, and get ready to transform your curtain fabric into light-blocking champs. Start by folding over the top and bottom edges of your curtain fabric to create hems, just like in the sewing method. Next, cut your blackout lining to match the size of your curtain fabric and place it between the folded fabric layers. Apply the hemming tape along the folded edges and use a hot iron to seal the deal. The heat activates the tape, making it stick like glue, securing the lining in place without any stitching. Now, your DIY no-sew blackout curtains are ready to hang, and they look just as sleek and functional as the sewn version. Plus, you've saved yourself a ton of time and effort.
Adding liners
Now, let's take your blackout curtains to the next level by adding some blackout curtain liners.
These nifty additions are the secret sauce for making sure your DIY curtains are top-notch light-blockers. Blackout liners are specially designed to do what they say on the tin: block out light. They're like the superhero sidekick to your curtain fabric.
To get started, cut your blackout liner to match the size of your curtain fabric and then attach it to the backside of your curtains. It's like giving your curtains an extra layer of light-fighting power.
Whether you're aiming for a pitch-black room for a good night's sleep or creating a cosy home theatre experience, blackout curtain liners are your ticket to a darker, more private space. So, go ahead and take your DIY blackout curtains up a notch with these light-blocking champs.
Installing hardware
Installing the right hardware is crucial to ensure they not only look great but also function smoothly.
Check out your existing decor and choose a curtain rod that matches or complements your style – there are plenty of options out there to suit any taste.
Make sure it's sturdy enough to support the weight of your blackout material without sagging. If you're on a budget or looking for an unconventional option, don't rule out repurposing an old shower curtain rod – it can work surprisingly well!
Once you've got your rod in place, hang your blackout curtains, and step back to admire your handiwork. You've not only added a touch of style to your windows but also created a practical solution to keep out unwanted light and maintain your privacy.
Maintenance and cleaning

Maintaining and cleaning your blackout curtains is a breeze.
To keep them looking their best, give them a gentle shake or a quick vacuum with a brush attachment from time to time to remove any dust or loose dirt. If you happen to spill something on them, don't panic! Just grab a clean, damp cloth and blot the stain gently – avoid rubbing, as it can damage the fabric.
For a deeper clean, check the care instructions on the fabric and lining, as they may vary. In many cases, you can toss them in the washing machine on a gentle cycle with cold water. Be sure to remove any hooks or hardware before washing. Hang them back up to air dry, and voila, your blackout curtains are as good as new, ready to keep your room dark and cosy for many nights to come.
Conclusion
Whether you're a DIY enthusiast or a newbie to the world of home decor, you've got the tools to create stylish, light-blocking champs that'll transform your space. From measuring and cutting to choosing between sewing or no-sew methods, you've learned the ropes of blackout curtain crafting. Don't forget to consider adding blackout liners for that extra oomph in light-blocking power.
With a bit of creativity and some TLC, your windows are now dressed to impress and ready to keep out unwanted light.
So, go on, make those windows pop, enjoy some quality sleep, and bask in the cosy ambience of your newly adorned space.
Happy crafting!
Spread the word
Recommended reading:


There are no comments yet
"*" indicates required fields